AI Line Art for Coloring Books: Guide
AI Line Art for Coloring Books: Guide
AI tools are transforming how coloring books are created. With software like Coloring Book Engine, you can generate high-quality, print-ready line art in minutes using simple text prompts. This approach eliminates the need for advanced art skills or lengthy manual processes. Here's what you need to know:
- Fast Process: Create up to 50 pages in 15–20 minutes.
- Ease of Use: Write prompts like "simple line art, clean outlines, no shading" to produce professional designs.
- Customizable Output: Generate unique, tailored artwork instead of relying on pre-made clip art.
- Accessible Tools: Platforms support local processing, ensuring data privacy and cost control.
This guide explains how to plan prompts, refine AI-generated designs, and meet publishing standards like Amazon KDP's requirements (e.g., 300 DPI vs 72 DPI resolution, proper margins, and bleed). By mastering a few key steps - prompt writing, editing, and formatting - you can create polished, market-ready coloring books efficiently.
How to Make a Coloring Book with AI (Amazon KDP)
Basics of AI-Generated Line Art
AI transforms text or photos into sharp line art by using techniques like edge detection, threshold processing, and vectorization. Here's how it works: edge detection scans an image to identify outlines and details, converting them into clean black lines on a white background. Threshold processing removes gray tones and fuzzy edges, ensuring the image is purely black and white - perfect for coloring pages. Finally, vectorization turns raster images into scalable SVG files, so lines stay smooth and crisp no matter the print size.
This entire process is remarkably fast, often taking just 30 seconds with AI tools. For more precise control, advanced systems like ControlNet allow users to combine visual inputs with text prompts, offering greater flexibility in composition. These steps form the backbone of how AI generates a variety of line art styles.
How AI Creates Line Art
When given a prompt or photo, AI simplifies the image by removing unnecessary noise and isolating the main subject. It then applies style transfer to create clean, customized outlines. Whether the goal is contour drawing, hatching, or cartoon-style lines, the AI tailors the output to match the chosen aesthetic. The result? A polished, ready-to-color outline.
What Makes Quality Line Art
Creating professional-quality line art requires precision. For coloring book pages, this means bold, clean outlines with solid black lines on a pure white background. Standard line thickness should range from 1–2pt, with finer details at a minimum of 0.5pt and bold borders reaching up to 4pt. Lines thinner than 0.5pt risk disappearing during printing.
Spacing is just as critical. Coloring areas between lines should be at least 0.25 inches wide to accommodate crayons, markers, or colored pencils. Shading, gradients, or gray tones should be avoided, as they detract from the coloring experience and appear unprofessional.
Consistency is another hallmark of quality. Line weight should remain uniform across each page and throughout the entire book. Avoid issues like double lines, gaps in outlines, or stray marks. To ensure sharp printing, files must be exported at a resolution of 300 DPI or higher.
Tools for Creating AI Line Art
One standout tool for professional creators is Coloring Book Engine. This desktop software is tailored for producing commercial-grade coloring book designs. It uses a BYOK (Bring Your Own Key) model and supports local GPU processing, giving creators full control over costs, data privacy, and workflow ownership.
Designed for large-scale production, the software can handle bulk generation, export print-ready files in publisher-approved formats (like those required by KDP), and meet all technical specifications. Best of all, it eliminates the need for unpredictable cloud fees, making it a reliable choice for serious creators.
How to Create AI Line Art: Step-by-Step
3-Step Process for Creating AI Line Art for Coloring Books
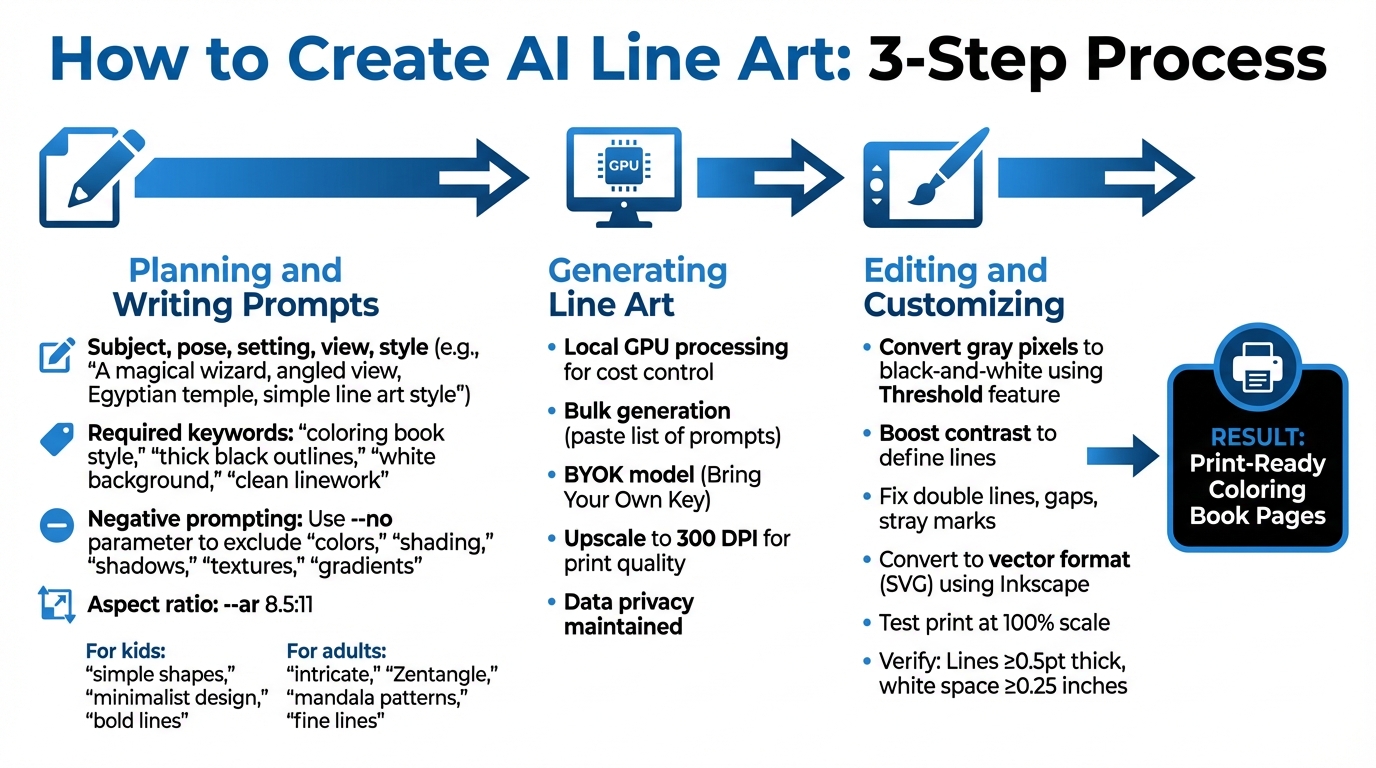
Creating high-quality line art for coloring books involves three key phases: planning your prompts, generating the artwork, and refining the final output. These steps ensure your designs meet print standards and are enjoyable to color. Begin by crafting thoughtful prompts to set the foundation for printable, colorable art.
Step 1: Planning and Writing Prompts
Start by building prompts that combine key elements such as subject, pose, setting, view, and style. For instance, a prompt like "A magical wizard, angled view, Egyptian temple, simple line art style" provides clear guidance to the AI. To ensure the artwork is suitable for coloring books, include terms like "coloring book style," "thick black outlines," "white background," and "clean linework".
Negative prompting is a handy tool to exclude unwanted features. Using the --no parameter, you can remove elements such as "colors," "shading," "shadows," "textures," and "gradients". To match standard letter-sized pages, add --ar 8.5:11 to your prompts.
Tailor the complexity of your prompts to your audience. For kids, focus on simplicity with keywords like "simple shapes," "minimalist design," and "bold lines." For adult coloring books, opt for more detailed styles using terms like "intricate," "Zentangle," "mandala patterns," or "fine lines". As Ben Robertson explains:
The best designs have enough detail to be interesting but not so much that they overwhelm the person coloring.
If you're creating a series of pages, use a consistent seed (e.g., --seed) to maintain a uniform look across multiple designs.
Once your prompts are ready, you're set for the next step in the plan to publish workflow: generating the artwork.
Step 2: Generating Line Art
The Coloring Book Engine simplifies the process by using local GPU processing to generate your designs. This method ensures control over production while keeping costs manageable. The desktop tool even supports bulk generation, allowing you to create multiple pages at once by pasting a list of prompts.
With the BYOK (Bring Your Own Key) model, you can use your own API keys, avoiding additional fees. Plus, local GPU processing keeps your creative work private. Before moving to the editing phase, upscale your images to ensure the lines remain crisp at 300 DPI, which is essential for professional print quality.
Step 3: Editing and Customizing Your Art
After generating your artwork, editing is crucial to make it print-ready. Use tools like Photoshop or GIMP's Threshold feature to convert any gray pixels into sharp black-and-white lines. Boost contrast to clearly define the lines and eliminate background noise.
Carefully inspect the artwork for issues like double lines, gaps in outlines, or stray marks. Use a brush tool to fix broken lines and an eraser to clean up any unwanted artifacts. To prepare your designs for infinite scaling without losing quality, convert raster images to vector format (SVG) using software like Inkscape.
Finally, print a test page at 100% scale on your home printer. Check that the lines are thick enough (at least 0.5pt) and that there's enough white space (minimum 0.25 inches) between coloring areas. This ensures your designs are both visually appealing and easy to color.
sbb-itb-c02bfb4
Exporting Print-Ready Pages
Getting your files ready for professional printing is a crucial step to ensure your coloring book looks sharp and meets quality standards, especially if you're publishing on platforms like Amazon KDP.
Setting Up Artwork for Print
To achieve high-quality output, set your resolution to 300 DPI. For an 8.5″ x 11″ page, this translates to at least 2,550 x 3,300 pixels. Make sure all lines are at least 0.75 pt (0.3 mm) thick for clear, crisp printing. If your artwork extends to the edges of the page, include a 0.125″ (3.2 mm) bleed on the top, bottom, and outer edges. To avoid accidental trimming, keep important design elements at least 0.25″ away from the trim edges and 0.5″ from the gutter.
For interiors, use Grayscale color mode and flatten all transparent layers to avoid printing errors. When exporting, save your manuscript as a single PDF file, preferably in the PDF/X-1a format, which aligns with KDP's requirements.
| Requirement | Specification |
|---|---|
| Resolution | 300 DPI minimum |
| Line Weight | 0.75 pt (0.3 mm) minimum |
| Bleed | 0.125″ (3.2 mm) |
| File Format | PDF (PDF/X-1a preferred) |
| Max File Size | 650 MB |
Once these settings are in place, you can move on to exporting your pages efficiently.
Batch Exporting Multiple Pages
After ensuring your artwork meets all print specifications, you can streamline your workflow by exporting pages in bulk. Tools like Coloring Book Engine allow you to process multiple pages at once while maintaining consistent quality. To keep your files organized, name them sequentially (e.g., BookTitle_001.png, BookTitle_002.png) for proper ordering. For single-sided printing, place line art on right-hand (odd-numbered) pages, leaving left-hand pages blank to prevent marker bleed-through.
When creating your PDF, make sure to embed all fonts to avoid rendering issues during printing.
Meeting KDP Format Requirements
Amazon KDP has strict formatting rules for coloring books. Your book must have at least 24 pages and can include up to 828 pages for a paperback. As the page count increases, adjust the inside margin (gutter) to account for the thicker spine:
| Page Count | Inside (Gutter) Margin |
|---|---|
| 24 to 150 pages | 0.375″ (9.6 mm) |
| 151 to 300 pages | 0.5″ (12.7 mm) |
| 301 to 500 pages | 0.625″ (15.9 mm) |
| 501 to 700 pages | 0.75″ (19.1 mm) |
Additionally, KDP requires you to disclose if your book includes AI-generated content during the upload process. Before finalizing, order a proof copy to check line weight, margin alignment, and overall print quality. The review process typically takes 24–72 hours. Following these steps ensures your coloring book is ready for publication, from artwork creation to the final printed product.
Best Practices for Production
Once you've mastered the creation and export process, it's time to focus on the finer details of production. These practices will help you produce a professional-quality coloring book while keeping your workflow efficient.
Keeping Pages Consistent
Consistency is what sets professional coloring books apart. Before diving into artwork creation, decide on your theme and audience. Are you designing intricate botanical illustrations for adults or simple, playful animals for kids? This choice will guide everything, from line thickness to spacing. For children’s books, stick with a minimum line thickness of 2 pt, while adult designs can range between 1–2 pt. For highly detailed sections, adjust to 0.5 pt using vector tools for precision.
To maintain a cohesive style, use standardized prompts. Referencing specific art movements like Art Nouveau or Baroque, or describing artistic styles, can help guide the AI. As Billie Lucas points out:
AI speeds up bulk page generation, but crisp, consistent line art and careful layout planning make printable books sellable.
Work in large batches of 40–60 images to streamline the process. After generating, review each image at 100% zoom to weed out style inconsistencies or broken outlines before moving forward. To ensure clean, colorable designs, apply a threshold filter to convert all pixels to pure black and white, eliminating any gray areas that might frustrate users. For vector-based projects, convert raster images to SVG files. This allows you to adjust line thickness, smooth out corners, and simplify paths for a uniform look. Additionally, maintain at least 0.25" of white space between lines to make the designs easy to color.
Next, let's look at how to keep production costs in check.
Controlling AI Costs
Keeping AI-related expenses under control is essential for maintaining profitability. The Bring Your Own Key (BYOK) model is a smart way to manage costs. It lets you connect your own API keys from providers like OpenAI, Google, or OpenRouter, giving you control over both expenses and data privacy. Platforms like Coloring Book Engine support this model, offering flexibility and predictability.
For added savings, consider using local GPU processing. Start by running local models for concept testing and iterations. Then, switch to higher-end cloud models only when you're finalizing production files. This hybrid approach can significantly reduce costs without compromising quality.
To further optimize, craft precise prompts. Include specific instructions like "no shading", "pure white background", and "thick black outlines" to avoid unnecessary expenses. Generate images in batches of 40–60 pages to standardize costs and maintain consistent stroke widths. Review these batches at a lower resolution first, and only invest in upscaling or high-resolution exports for the best selections.
Finally, an organized file system can save time and protect your work.
Organizing and Protecting Your Files
A well-organized file system is crucial for preventing errors and keeping production smooth. Use a consistent naming convention, such as "BookTitle_001.png", to ensure pages remain in order automatically. Group files by sections or themes (e.g., "Ocean Animals" or "Forest Creatures") to simplify assembly.
Save a library of prompts and style settings that worked well. This will help you maintain visual consistency if you need to add pages later or create a sequel book. Use design templates with preset margins and bleed areas that match standard trim sizes, like 8.5" x 11", to keep your projects uniform. Before finalizing your interior PDF, inspect each page at 100% zoom for stray pixels or broken lines.
Always back up your work. Store all generated assets and final files on a cloud service or external drive to protect against data loss. For Amazon KDP projects with single-sided printing, structure your files so blank pages (even-numbered) alternate with designs (odd-numbered). Lastly, ensure all images meet a resolution of at least 300 DPI at the final trim size. If you're using vector tools, double-check that paths are clean, endpoints are joined, and there are no duplicate lines before exporting to PDF/X-1a.
Conclusion
Artificial intelligence has made it possible for creators to design professional coloring books with ease. To achieve high-quality results, focus on clean outlines, strong contrast, consistent line weights (1–2pt), and a resolution of 300 DPI. By combining precise prompts with efficient post-processing, you can create print-ready pages that meet industry standards. This technical groundwork allows for smoother and more specialized workflows.
While general AI tools often require manual adjustments, purpose-built solutions simplify the process. These specialized tools let you concentrate on the creative aspects rather than getting bogged down in technical fixes, saving time and effort.
Managing costs and safeguarding data are essential considerations. The BYOK (Bring Your Own Key) model offers predictable expenses and ensures you maintain control over your creative assets. Whether you're testing concepts on local GPUs or producing high-resolution final designs, this approach keeps your tools, workflow, and margins entirely under your control. Prioritizing cost management and data privacy strengthens your production process.
Coloring Book Engine exemplifies this approach. With lifetime access starting at $99, it eliminates subscription fees and surprise costs. You can generate pages on your local device, integrate your own API keys, and export KDP-ready files - all without relying on cloud services or compromising your data.
Start with a clear theme, test your designs with sample prints, and develop a library of reliable prompts. With the right tools and strategies, you can confidently create commercial-grade coloring books that stand out in the competitive market.
FAQs
What steps should I take to ensure my AI-generated line art is ready for Amazon KDP publishing?
To ensure your line art meets Amazon KDP's requirements, it must be high-resolution (300 dpi) and formatted in black-and-white with clean, high-contrast lines that are no thinner than 0.5 pt. Add a 0.125-inch bleed and maintain at least 0.25-inch margins around the artwork. Make sure the dimensions align with your selected KDP trim size, and export the final file as a print-ready PDF. Also, double-check that all content is original and does not infringe on any copyrights.
How can I write effective prompts for generating AI line art for coloring books?
To create clean and printable line art using AI, focus on three essential elements: clearly identify your audience, describe the style in detail, and specify what to exclude. A good formula for your prompt is: Audience + Subject + Style Details + Exclusions. For instance: “Coloring page for kids, a playful fox, crisp black outlines, no shading, no color fill.” This approach ensures the AI emphasizes simplicity and clarity.
Incorporate keywords like line drawing, black-and-white, bold lines, and white background to highlight the line-art qualities you're aiming for. Use negative prompts to steer clear of unwanted elements, such as “no colors, no shading, no textures.” It's also a good idea to set the aspect ratio to match standard U.S. printing sizes, like 8.5:11. Here's an example of a well-crafted prompt:
[Subject], coloring book style, thick black outlines, white background, bold lines, minimalist design, high-contrast black-and-white drawing, clean linework --ar 8.5:11 --no colors, textures, shadingBy combining clear descriptions, style-focused keywords, and specific exclusions, you can reliably generate high-quality, print-ready line art for your coloring book projects.
How can I control expenses when using AI to design coloring book pages?
To keep expenses under control, opt for tools with clear, predictable pricing models. Focus on solutions that let you pay based on actual usage, such as those with one-time fees or options for processing AI locally, which can help you avoid ongoing subscription costs. Additionally, by generating only the necessary pages and streamlining your workflow, you can protect your profit margins while keeping expenses in check.