KDP Trim Size and Bleed: Checklist for Exports
KDP Trim Size and Bleed: Checklist for Exports
When publishing on KDP, getting your file dimensions and bleed settings right is critical to avoid rejections, delays, or costly reprints. Here's what you need to know:
- Trim Size: Choose your book's final dimensions based on genre and content. Popular options include 6" × 9" for novels and 8.5" × 11" for workbooks or coloring books. Larger sizes may increase printing costs.
- Bleed: If your design extends to the edge of the page, add 0.125" bleed on the top, bottom, and outside edges. For example, a 6" × 9" book with bleed exports at 6.125" × 9.25".
- Margins: Adjust inside (gutter) margins based on your page count to prevent text from disappearing into the spine. Outside margins should be at least 0.375" for books with bleed.
- Export Settings: Save your file as a PDF with 300 DPI resolution, using CMYK color space. Ensure fonts are embedded, and avoid locking or encrypting the file.
- KDP Preview Tool: Use this tool to catch errors like incorrect bleed or misaligned text before submission.
How to Format KDP Self Published Books - Bleed and Margin
Step 1: Confirm Your Trim Size
Your trim size determines your book's final physical dimensions. On KDP, you’ll find a range of options, from 4″ to 8.5″ wide and 6″ to 11.69″ tall. In the U.S., the most popular trim size for trade paperbacks is 6″ × 9″, but the ideal size depends on your book’s genre and purpose.
KDP divides trim sizes into two categories: Regular and Large. Books wider than 6.12″ or taller than 9″ fall into the Large category, which affects printing costs - larger sizes generally cost more to produce. For novels or memoirs, sticking with 6″ × 9″ can help keep costs manageable and ensure eligibility for Expanded Distribution. On the other hand, workbooks and coloring books often require more space, making 8.5″ × 11″ a great choice for these formats.
Standard Trim Sizes and Their Uses
Different genres call for different trim sizes. Fiction novels typically use 6″ × 9″ or 5″ × 8″ for a compact, mass-market look. Workbooks or textbooks, which need room for exercises and detailed layouts, usually go with the larger 8.5″ × 11″ format. Similarly, adult coloring books with intricate designs are best suited for 8.5″ × 11″, while simpler mandala or toddler coloring books might work better in a square 8.5″ × 8.5″ size.
If you’re using Coloring Book Engine to create a coloring book, you can choose 8.5″ × 11″ for detailed designs or 8.5″ × 8.5″ for symmetrical patterns. The BYOK model allows you to generate designs at precise dimensions without worrying about unexpected cloud-based costs.
Now, let’s look at how your trim size choice directly impacts production costs.
Trim Size and Printing Costs
Larger trim sizes come with higher production costs. They increase printing expenses and raise the minimum list price needed to turn a profit. Before finalizing your layout, use the KDP Printing Cost and Royalty Calculator to see how different sizes affect your earnings. If your design is close to the Large category threshold, consider switching to 6″ × 9″ to take advantage of lower printing rates.
It’s also important to remember that trim size affects page count. A manuscript formatted at 5″ × 8″ will usually result in more pages than the same content formatted at 8.5″ × 11″. Since KDP charges per page, a smaller trim size could lead to higher printing costs if the page count increases significantly. Test different sizes to find the right balance between design needs and profitability before committing to a final layout.
Step 2: Set Up Your Bleed Requirements
Once you've confirmed your trim size, the next step is to determine if your project needs bleed. This is crucial for avoiding those unwanted white edges around your design.
What Bleed Is and When You Need It
Bleed refers to any images, colors, or graphics that extend beyond the trim edge of your page. It's there to account for slight paper shifts during the cutting process.
"Setting your bleed properly ensures printed objects reach all the way to the edge of the page. Accounting for bleed is important, because it prevents a white border from appearing at the edge of the page when the book is trimmed." - Amazon KDP
For KDP projects, bleed is mandatory for book covers. As for interiors, bleed is only needed if your content reaches the page's edge. This is typical for coloring books, children's books with full-page illustrations, photobooks, or journals with decorative borders.
If even one page in your interior requires bleed, the entire file must include it - there's no mixing bleed and non-bleed pages. Additionally, KDP only accepts bleed settings in print-ready PDF files. Formats like DOCX or RTF are strictly for non-bleed projects.
For those using tools like Coloring Book Engine to create full-page designs, ensure you export with bleed settings enabled. This tool allows you to set precise dimensions and manage your file setup without relying on cloud-based constraints.
Now, let’s look at the exact bleed measurements required for KDP.
KDP Bleed Measurements
KDP requires a standard bleed of 0.125 inches (3.2 mm) on the top, bottom, and outside edges of your page. This means your final PDF dimensions will be slightly larger than your trim size to include the bleed area.
To calculate these dimensions, add 0.125 inches to the width and 0.25 inches to the total height (0.125 inches each for the top and bottom). For example, if your trim size is 8.5″ × 11″, your export dimensions should be 8.625″ × 11.25″.
| Trim Size | Page Size With Bleed |
|---|---|
| 5″ × 8″ | 5.125″ × 8.25″ |
| 6″ × 9″ | 6.125″ × 9.25″ |
| 8.5″ × 11″ | 8.625″ × 11.25″ |
| 8.25″ × 8.25″ | 8.375″ × 8.5″ |
When adding bleed, you'll also need to adjust your minimum outside margins to 0.375 inches (9.6 mm). This ensures that important content won't be trimmed off. The inside margin (or gutter) doesn’t require bleed since it’s glued into the spine, but it should increase as your page count grows.
Step 3: Calculate Your Export Dimensions
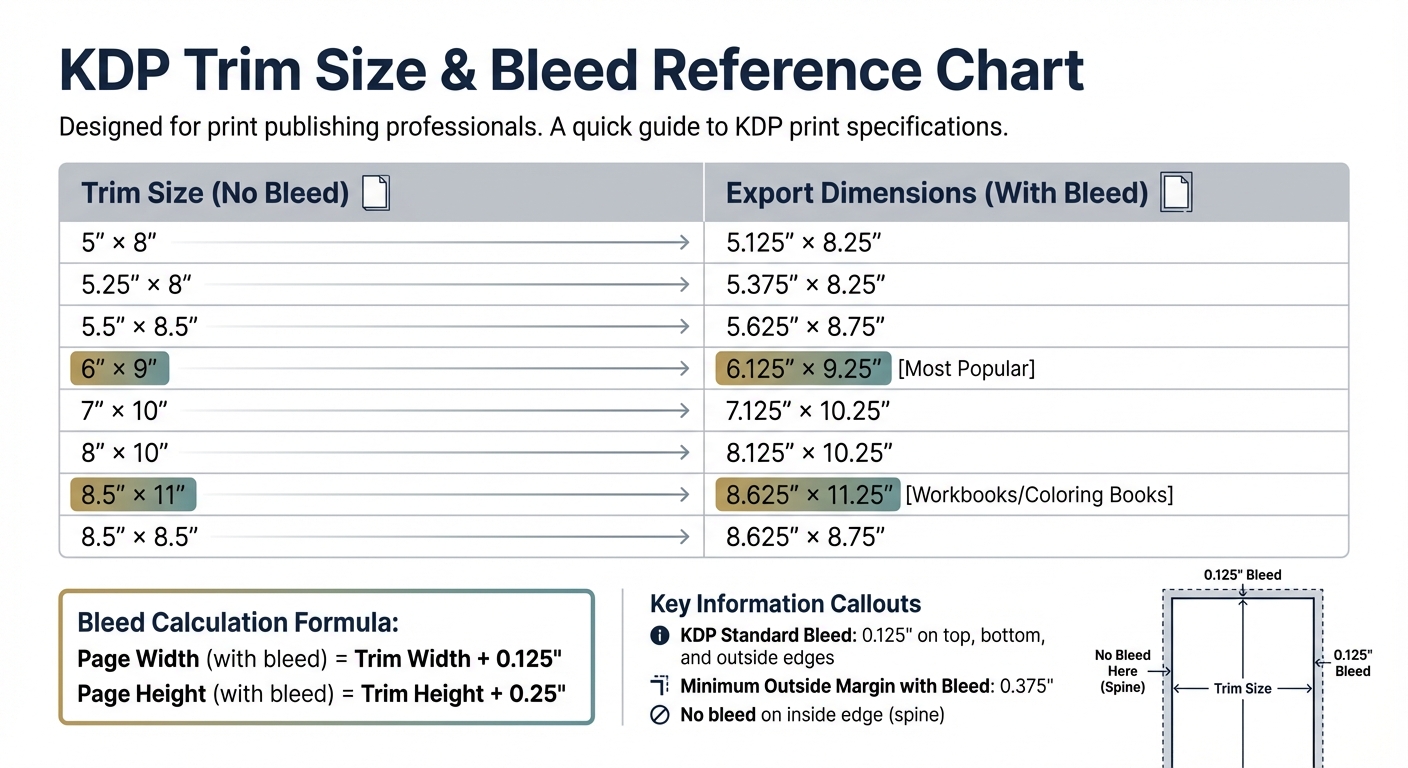
KDP Trim Sizes and Bleed Dimensions Quick Reference Guide
To determine your export dimensions, use this straightforward formula.
Page Dimension Formula
If your project doesn't require bleed, your export dimensions will match your trim size. For instance, a book with a 6″ × 9″ trim size will export at exactly 6″ × 9″.
However, if bleed is needed, you’ll need to add extra space to the dimensions. Specifically, add 0.125″ to the width and 0.25″ to the height (0.125″ for the top and 0.125″ for the bottom). Here's the formula:
- Page Width (with bleed) = Trim Width + 0.125″
- Page Height (with bleed) = Trim Height + 0.25″
For example, an 8.5″ × 11″ trim size would result in export dimensions of 8.625″ × 11.25″ when bleed is included.
Keep in mind that bleed applies only to the top, bottom, and outside edges. If you're using Coloring Book Engine, the software will handle these calculations automatically when you enable bleed.
Quick Reference Dimension Table
To save time, use this table for common KDP trim sizes and their corresponding export dimensions with bleed:
| Trim Size (No Bleed) | Export Dimensions (with Bleed) |
|---|---|
| 5″ × 8″ | 5.125″ × 8.25″ |
| 5.25″ × 8″ | 5.375″ × 8.25″ |
| 5.5″ × 8.5″ | 5.625″ × 8.75″ |
| 6″ × 9″ | 6.125″ × 9.25″ |
| 7″ × 10″ | 7.125″ × 10.25″ |
| 8″ × 10″ | 8.125″ × 10.25″ |
| 8.5″ × 11″ | 8.625″ × 11.25″ |
| 8.5″ × 8.5″ | 8.625″ × 8.75″ |
In the United States, the 6″ × 9″ trim size is the most popular for books, while 8.5″ × 11″ is a go-to for coloring books and workbooks.
One critical rule to note: if even a single page in your manuscript requires bleed, the entire file must use bleed dimensions. Mixing bleed and non-bleed pages is not allowed. Additionally, manuscripts with bleed must be uploaded as PDFs because formats like DOCX or RTF won’t maintain the precise dimensions required by KDP.
Once you've finalized your export dimensions, the next step is to follow a proven publishing workflow and adjust your margins to align with KDP's guidelines.
sbb-itb-c02bfb4
Step 4: Set Margins Based on Page Count
Once your export dimensions are set, the next step is adjusting margins to meet KDP's specifications. Margins, particularly the inside margin (or gutter), need to accommodate the thickness of your book. A slim 50-page book and a hefty 500-page book require different gutter widths to ensure the text remains readable.
Inside and Outside Margin Guidelines
KDP determines gutter width based on the total number of pages in your book. Here's a quick breakdown:
- 24 to 150 pages: Minimum inside margin of 0.375"
- 151 to 300 pages: Minimum inside margin of 0.5"
- 301 to 500 pages: Minimum inside margin of 0.625"
- 501 to 700 pages: Minimum inside margin of 0.75"
- 701 to 828 pages: Minimum inside margin of 0.875"
The more pages your book has, the wider the gutter needs to be to accommodate the spine and prevent text from getting lost in the binding. These measurements apply no matter your trim size.
The outside margin, which is the edge of the page opposite the spine, remains consistent. If your book doesn't include bleed, the minimum outside margin is 0.25". For books with bleed, this increases to 0.375". While these are the technical minimums, many designers recommend setting the outside margin slightly larger - above 0.375" - for a cleaner and more polished look.
When creating your layout, enable mirror margins in your design software. This ensures the gutter alternates correctly between left and right pages. If your software has separate fields for the inside margin and gutter, set both to the required width. After that, you can finalize the top and bottom margins to complete your design.
Top and Bottom Margin Guidelines
For the top and bottom margins, the minimum requirement is 0.25" (or 0.375" if your book includes bleed). However, you have more flexibility here. Setting these margins to 1.0" (or 1.25" with bleed) often results in a more balanced and visually appealing layout. Unlike the inside margin, the top and bottom margins don't depend on the page count - they're purely a matter of design preference, as long as you meet the minimum size requirements.
Step 5: Export Your File for KDP
Once your margins are set, the last step is exporting your file with the correct technical settings to meet KDP's requirements. Using the wrong file format, resolution, or color space can lead to delays or even rejection of your book.
File Format and Resolution Settings
Export your manuscript as a PDF compliant with the PDF/X-1a standard and ensure a resolution of at least 300 DPI. Images with resolutions below 200 DPI are considered too low for quality printing.
To maintain image quality, disable downsampling during export. Make sure all fonts are fully embedded (not subsets) to avoid display issues. Export your manuscript as single pages, not two-page spreads, and flatten transparency to reduce potential printing errors.
Color Space and Bleed Settings
For accurate print colors, convert all images to the CMYK color space before exporting. If your book includes bleed, your PDF page size should be 0.125 inches wider and 0.25 inches taller than the book's trim size.
Keep the file size under 650MB to ensure faster processing during upload. Also, avoid locking, encrypting, or password-protecting your PDF, as secured files cannot pass KDP's review process.
These steps ensure your file matches the dimensions and bleed requirements you've already established.
File Naming Best Practices
Once your technical settings are correct, focus on naming your files clearly and systematically.
Save each export as a new file rather than overwriting older versions to avoid data corruption. Use a consistent naming convention, such as BookTitle_Interior_v1.pdf, and clearly label files as "Manuscript" or "Cover" to avoid confusion during upload. Before finalizing, double-check your PDF for accuracy to ensure everything is ready for KDP.
Final Checks Before Upload
After exporting your file, take the time to double-check every dimension. Even a tiny mistake, like a one-pixel discrepancy, can result in your file being rejected.
Verify Dimensions and Margins
Open your PDF and ensure that all dimensions, bleed, and margin specifications align with your earlier calculations. For instance, if you're working with a standard 8.5″ × 11″ book that includes bleed, your exported file should measure 8.625″ × 11.25″.
Pay special attention to the inside margins, as these vary based on the page count. Here's a quick guideline:
- Books with 24 to 150 pages: Require a 0.375-inch gutter.
- Books with 701 to 828 pages: Need a 0.875-inch gutter.
For outside margins, ensure they're at least 0.375 inches if your book includes bleed. Additionally, confirm that page numbers are correctly placed - even numbers should appear on the left pages, and odd numbers on the right.
Once you're confident that the physical dimensions and margins are accurate, move on to reviewing the layout using the KDP Preview Tool.
Use KDP Preview Tool
After verifying the technical aspects, upload your file to KDP and use the Preview Tool for a detailed layout inspection. This tool is designed to highlight potential issues, such as:
- Content outside the safe zone: Marked with red dashed lines.
- Insufficient bleed: Displayed as white borders where the bleed is incomplete.
Pay close attention to images that are meant to extend to the edge of the page. These should reach all the way to the PDF's boundary, not just the trim line. The tool will also flag text that’s too close to the trim edge or falls below the 7-point minimum font size.
Make sure to wait until the file processing is complete before launching the Preview Tool. This step is crucial for confirming that spine and margin calculations are accurate.
Conclusion
Getting your KDP file ready the right way can save you from unnecessary rejections and frustrating delays. Did you know that 73% of first-time authors experience at least one book cover rejection, and 38% of those rejections happen because of incorrect dimensions or DPI? These issues are completely avoidable if you follow the right steps.
The process we’ve outlined - choosing the correct trim size, setting up bleed, calculating export dimensions, adjusting margins, and exporting properly - tackles the most common technical problems head-on. By sticking to this workflow, you can significantly reduce errors and keep your project moving smoothly from concept to upload.
Following this checklist ensures your content is safe from trimming mishaps, with proper bleed and margins tailored to your book’s page count. It also helps protect critical elements like titles and page numbers from being accidentally cut off during production.
Before hitting that "Submit" button, make the KDP Preview Tool your go-to for a final check. This tool acts as your safety net, catching any last-minute issues. With this structured approach, file preparation becomes less of a guessing game and more of a reliable system for producing professional-quality results every time.
FAQs
What’s the difference between trim size and bleed in KDP publishing?
Trim size is the final size of your book’s pages after they’ve been trimmed during printing. Bleed refers to the extra margin - usually 0.125 inches on each side and 0.25 inches on the height - that extends beyond the trim line. This extra space makes sure that any edge-to-edge artwork or background color remains intact and doesn’t get cut off during the trimming process.
If you’re designing for KDP and your artwork or design stretches to the edges of the page, it’s essential to include bleed. This step ensures your finished book looks polished and professional.
How does selecting a larger trim size impact printing costs on KDP?
Choosing a larger trim size for your book on KDP can drive up printing costs. This happens because a bigger trim size uses more paper, which naturally increases production expenses.
When deciding on your book's trim size, it's important to strike a balance between your design and content requirements and your budget. This way, you can keep your costs manageable while still delivering a quality product.
Why should I use the KDP Preview Tool before submitting my book?
Using the KDP Preview Tool is a key step in making sure your book aligns with Amazon's formatting and quality requirements. This tool lets you see exactly how your book will look to readers, giving you the chance to spot and fix any issues with trim size, bleed, margins, or layout before submitting it.
Taking the time to preview your book can help you avoid rejections or disappointing your readers with formatting problems. It’s a simple way to ensure your book looks polished and professional, saving you from headaches later on.